


When a HDD with malfunctions connects to MRT hardware card, users can deal with the HDD with the help of MRT software. At that moment, the HDD is isolated with Windows OS, that is, this HDD will not be seen in the OS. However, sometimes we need to deal with the HDD with a third-party software, then we need to mount the HDD to OS. The procedures are as follows:
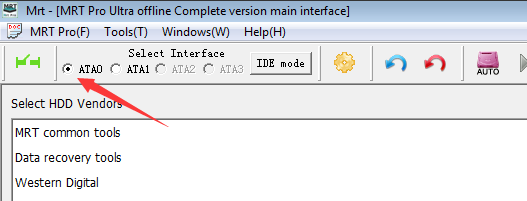
First of all, users need to enter the main interface of MRT software, and choose the ATA port which the HDD is connected to. As can be seen in the picture:
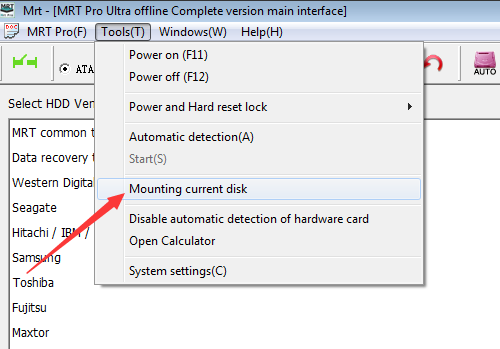
Then, click the menu “Tools – > Mounting current disk”, and a dialog window will pop up. The mounting mode is “Read only” by default, which can make sure nothing is written to the HDD. If a user choose “Write actually into”, data will be written into HDD when the user executes the operation of writing something into the HDD. Error may occur if some of the third-party software can not write, and the later operations can not be executed. So in order to avoid this problem, users can choose “Write Simulately into”. Then the third-party software will give a feedback of successfully writing. However, the data is actually not written into the HDD, the effect of which is the same with “Read only”. The picture of the menu is below:
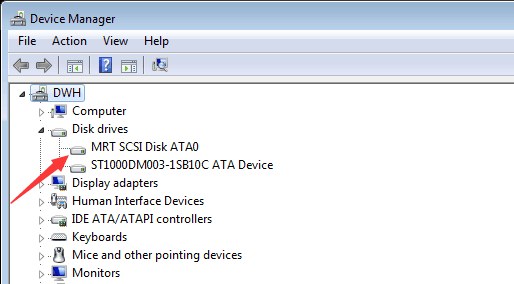
After mounting current disk successfully, there will be a MRT virtual disk in Windows device manager. Then what users do to the virtual disk is actually what users do to the HDD connected to MRT hardware card. If there are partitions or files in the HDD, we can see the corresponding symbols on the interface of “Computer”. Users can also deal with the HDD with the help of the third-party software like Winhex, DiskGenius and R-Studio. If the HDD is busy because of the bad tracks, MRT software will automatically execute the operations like soft reset or hard reset to correct the HDD status.
To cancel mounting, users just need to return to MRT main interface and click the menu “Tools – > Mounting current disk”.